



How Does Raspberry Pi Emulator Kit Work?
A Raspberry Pi emulator kit transforms the single-board computer into a multi-console gaming system by combining specific hardware components with emulation software that mimics classic gaming hardware. The system operates through distinct layers-physical hardware runs a Linux operating system, which hosts emulation software that translates old game code into instructions the Pi can execute.
The kit typically includes the Raspberry Pi board itself, a microSD card pre-loaded with emulation software like RetroPie, a power supply, controllers, and often a case with cooling components. When you power on the system, it boots into EmulationStation, a graphical interface that lets you browse and launch games stored as ROM files.
The Three-Layer Architecture
Understanding how these kits work requires looking at three interconnected layers that each handle specific functions.
Hardware Layer: The Foundation
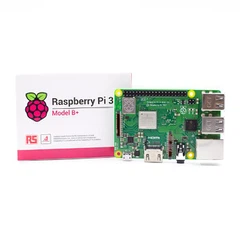
At the bottom sits the physical Raspberry Pi board-most commonly the Pi 4 Model B or the newer Pi 5. The Pi 4 features a Broadcom BCM2711 quad-core ARM Cortex-A72 processor running at 1.8 GHz, paired with 2GB to 8GB of LPDDR4 RAM. The Pi 5 ups the ante with Cortex-A76 cores at 2.4 GHz and improved graphics processing.
This hardware matters because emulation is computationally expensive. The Pi needs to simulate entirely different processor architectures in real-time. A Super Nintendo, for instance, used a 16-bit Ricoh 5A22 processor-the Pi must calculate what that chip would have done, then render the results through its own graphics pipeline.
The VideoCore GPU handles graphics rendering. On the Pi 4, it runs at 500 MHz, while the Pi 5's new VideoCore VII GPU reaches 800 MHz. This GPU acceleration is critical for smooth gameplay. Without it, the ARM CPU would struggle to maintain consistent frame rates, especially with 3D-capable systems like the Nintendo 64 or PlayStation.
Storage comes via microSD cards, typically 32GB to 128GB. Game ROMs (digital copies of cartridge data) live here alongside the operating system. Faster UHS-I or UHS-II rated cards improve loading times and reduce stuttering during gameplay.
Software Layer: The Emulation Stack
Above the hardware runs a modified version of Raspberry Pi OS (based on Debian Linux). This lightweight operating system provides the foundation for emulation software while minimizing resource overhead.
Most kits use RetroPie, a software distribution that bundles everything needed for retro gaming. RetroPie itself isn't an emulator-it's a collection of tools that work together. At its core sits RetroArch, a "frontend" that provides a unified interface for multiple emulation cores.
These cores are the actual emulators. Each core mimics a specific gaming system. For example, the SNES9x core emulates Super Nintendo hardware, while PCSX ReARMed handles PlayStation games. RetroArch loads the appropriate core based on which game you select, then passes controller inputs and manages audio/video output.
The relationship between components looks like this: EmulationStation (the menu you see) → RetroArch (the emulation framework) → Individual cores (system-specific emulators) → Your games (ROM files).
When you select a game, EmulationStation tells RetroArch which core to load and which ROM file to run. RetroArch initializes that core, loads the game data, and begins the emulation process. Your controller inputs get translated through RetroArch's input system into the format the core expects.
Interface Layer: Making It Usable
EmulationStation provides the visual menu system. It scans your ROM directories, displays game lists organized by console, and shows box art or screenshots (if you've downloaded metadata through its scraping feature). Navigation uses a gamepad or keyboard-no mouse required.
Configuration happens through nested menus. You can adjust video settings, remap controls per-system or per-game, enable cheats, or configure network features. The hotkey system lets you access these options mid-game by pressing a button combination, typically Select+Start to open the RetroArch menu.
This layered design means you can swap individual components without rebuilding everything. Want a different SNES emulator? Install a different core. Prefer a different frontend? Replace EmulationStation while keeping RetroArch. Need more power? Upgrade your Pi model and transfer your microSD card.
How Emulation Actually Happens
When you launch a game, several processes occur in milliseconds. The emulator core loads the ROM file into memory, parses its structure to understand the game's code and assets, then begins executing instructions.
Real-time translation is the key challenge. The original console's CPU spoke a different instruction set than the Pi's ARM processor. The emulator must interpret each instruction from the original hardware, figure out what it's supposed to do, then execute equivalent operations on the Pi.
This interpretation creates overhead. An SNES instruction might require 10 or 20 ARM instructions to simulate accurately. Multiply this by the millions of instructions processed per second during gameplay, and you see why emulation demands substantial processing power.
Some optimizations help. Dynamic recompilation (dynarec) translates blocks of original code into ARM code on-the-fly, caching the results for reuse. This is much faster than interpreting each instruction individually. Well-optimized cores like PCSX ReARMed use dynarec extensively, which is why PlayStation emulation runs smoothly on the Pi despite that console's relative complexity.
Graphics emulation follows a parallel path. Original consoles had dedicated graphics chips with specific capabilities-sprite handling, background layers, special effects. The emulator must recreate these in software, then render the results through the Pi's GPU using OpenGL ES. This is where GPU acceleration becomes critical; software rendering alone can't maintain 60 FPS for more demanding systems.
Audio presents similar challenges. The emulator simulates the sound chip's behavior, generating waveforms that match the original hardware's output. This audio stream then feeds through the Pi's audio subsystem, whether that's HDMI audio, the headphone jack, or Bluetooth to wireless speakers.

Performance Boundaries
Not all systems emulate equally well. The Pi 4 handles 8-bit and 16-bit consoles excellently-NES, SNES, Genesis, Game Boy all run at full speed with accuracy. PlayStation 1 games mostly work well, though some titles show slowdown during complex scenes.
Nintendo 64 emulation hits performance walls. That system's architecture was notoriously difficult to emulate accurately even on powerful PCs. The Pi 4 can run some N64 games at playable speeds with reduced accuracy settings, but demanding titles like Rogue Squadron remain choppy. The Pi 5's improved specs help here, with reports of better N64 compatibility, though it's still not perfect.
Dreamcast emulation shows promise on the Pi 5 using the Redream emulator. PlayStation 2, GameCube, and Wii remain largely out of reach-these systems are simply too complex for the Pi's capabilities. Their multi-processor architectures and sophisticated graphics require substantial horsepower that even the Pi 5 cannot provide consistently.
According to testing by Tom's Hardware, frame rates can drop noticeably with demanding PlayStation titles on the Pi 4, with fighting games showing stuttering during button presses. Recent benchmarks on the Pi 4 demonstrate smooth performance with properly optimized titles, particularly for 2D and less demanding 3D games.
The Pi 5 brings measurable improvements. Independent testing shows the Pi 5 handles Game Boy Advance, N64, Dreamcast, and PSP emulation with improved consistency compared to earlier models. Engineering optimizations like NUMA emulation can boost multi-core performance by up to 18% on the Pi 5, though such tweaks require kernel modifications beyond typical user configurations.
The Controller Translation System
Controller support deserves special attention because it's often misunderstood. When you first boot RetroPie, it asks you to configure a controller by pressing each button-D-pad directions, face buttons, shoulder buttons, start/select, and a "hotkey enable" button.
This initial configuration maps your physical controller to EmulationStation's menu system and creates a baseline profile for RetroArch. RetroArch then automatically generates controller configurations for each emulator core based on that profile.
But here's where it gets interesting: different consoles had different button layouts. An SNES controller had four face buttons and two shoulder buttons. A PlayStation controller added two more shoulder buttons and analog sticks. A Genesis controller only had three face buttons initially.
RetroArch's controller abstraction layer maps your modern controller's buttons to whatever the original system expected. If you're using a PlayStation DualShock 4 with 16 buttons to play an NES game that only used 4 buttons, RetroArch simply ignores the extra inputs unless you've specifically mapped them to emulator functions like save states or fast-forward.
Per-game remapping is possible. If a specific title feels awkward with the default mapping, you can enter the RetroArch menu during gameplay and reconfigure controls just for that game. The changes save automatically.
USB controllers work plug-and-play after initial configuration. Bluetooth controllers require pairing through RetroPie's Bluetooth setup menu, which walks through discovery and connection. Once paired, Bluetooth controllers reconnect automatically on boot.
Storage and File Management
The microSD card structure is straightforward but important to understand. The /boot partition contains the Linux kernel and boot configuration files. The main partition holds the operating system, RetroPie software, and your ROMs.
ROM files live in /home/pi/RetroPie/roms/, with subdirectories for each system-nes/, snes/, psx/, etc. EmulationStation scans these directories on startup and displays whatever it finds.
Getting ROMs onto the Pi happens several ways. The USB method is simplest: create a folder named retropie on a FAT32-formatted flash drive, plug it into the Pi, wait a minute while it creates the folder structure, then remove it and copy ROMs into the appropriate console folders on your computer. Plug it back into the Pi, wait for the transfer, and reboot.
Network transfer works via Samba (Windows file sharing). From another computer on your network, you can access \\retropie and see the ROM folders directly. Drag and drop files as needed, then restart EmulationStation to refresh the game lists.
Some systems require BIOS files-binary code from the original hardware needed for accurate emulation. PlayStation emulation, for example, needs the PS1 BIOS. These files go in /home/pi/RetroPie/BIOS/. Without them, many games won't load.
Save states differ from in-game saves. In-game saves work exactly as they did on original hardware, stored within the ROM's save data. Save states are emulator features that snapshot the entire system state at any moment. You can save and load these instantly, even in games that never had save functionality. RetroArch stores these in /home/pi/RetroPie/retroarch/states/.
Power and Thermal Management
Power delivery affects performance more than many realize. The Pi 4 requires a 5V/3A (15W) power supply; the Pi 5 needs 5V/5A (25W) for stable operation, especially with demanding emulation. Underpowering causes throttling-the system automatically reduces clock speed to prevent instability, resulting in slowdown during gameplay.
The Pi doesn't have a power button in the traditional sense. Plugging in power turns it on. Properly shutting down requires using EmulationStation's menu to select "Shutdown System," which performs a clean shutdown before cutting power. Simply unplugging a running Pi risks corrupting your microSD card.
Heat becomes a factor during extended play sessions. The Pi 4 generates significant heat under load, with testing showing thermal throttling can occur without adequate cooling. Cases with built-in fans or heatsinks prevent this. The Pi 5 runs even hotter due to its increased performance, making active cooling practically mandatory for consistent emulation.
Overclocking pushes the Pi beyond its stock speeds for better performance. This increases both power draw and heat output. Recent optimizations to SDRAM timings on the Pi 5 achieved 10-20% speed improvements at stock clocks, with careful overclocking reaching up to 32% gains at 3.2 GHz. Such modifications require adequate cooling and carry risks of instability.

Alternative Emulation Platforms
While RetroPie dominates, alternatives exist with different philosophies. Recalbox prioritizes ease of use with more automation but less customization. Lakka offers a lightweight, console-like experience using LibreELEC as its base. Batocera provides extensive platform support and built-in game streaming capabilities.
Recent platform comparisons on the Pi 5 show Batocera offering solid multi-console support with 8-player controller configuration, while Lakka excels at straightforward emulation with a PlayStation-inspired interface. Each platform makes different tradeoffs between simplicity and flexibility.
The fundamental architecture remains similar across platforms-Linux base, RetroArch framework, multiple emulator cores. The differences lie in interface design, included features, and configuration approaches. Users seeking more control tend toward RetroPie, while those wanting plug-and-play simplicity may prefer Recalbox.
When Things Don't Work
Performance problems typically stem from a few common sources. Underpowered supplies cause random crashes or slowdown. Slow microSD cards create stuttering during level loads. Overheating triggers throttling that manifests as sudden frame drops.
If a specific game won't load, wrong ROM formats are usually culprit. Different emulator cores support different file formats. PlayStation games might be in .bin/.cue, .chd, or .pbp formats-not all cores read all formats. Checking the core's documentation reveals which formats it expects.
Some games require specific emulator cores. Neo Geo games need both the game ROM and the Neo Geo BIOS file to function. Arcade ROMs must match the MAME version the emulator expects-using a ROM set designed for MAME 0.78 with MAME 2003 Plus won't work.
Controller issues often trace to the hotkey configuration. If buttons seem unresponsive in games, it's frequently because the hotkey enable button is pressed simultaneously, putting RetroArch into a mode where it's waiting for emulator commands instead of passing inputs to the game.
Frequently Asked Questions
Can I use any Raspberry Pi model for emulation?
While any Pi technically works, the Pi 4 with at least 2GB RAM is the practical minimum for good performance with most systems. Earlier models struggle with anything beyond 8-bit consoles. The Pi Zero is too underpowered for comfortable emulation of systems beyond the NES/Game Boy era.
Do I need original game cartridges to use emulator kits legally?
Copyright laws around ROMs vary by jurisdiction. The safest approach is only using games you personally own physical copies of, though enforcement and legal clarity differ significantly by region. RetroPie includes no copyrighted content-you must provide your own game files.
Can I add games after the initial setup?
Yes, adding ROMs is straightforward using either USB transfer or network file sharing. Place ROM files in the appropriate console folder within /home/pi/RetroPie/roms/, then restart EmulationStation to refresh the game list.
How much storage do I need?
A 32GB microSD card holds hundreds of 8-bit and 16-bit games. PlayStation and N64 games take more space-about 500MB per PS1 game, 10-50MB for N64 titles. A 64GB card provides comfortable room for a diverse library across multiple systems.
Looking at the Complete System
The elegance of Raspberry Pi emulator kits lies in how relatively simple components combine into a capable retro gaming solution. The Pi's ARM processor wasn't designed for emulation, yet through clever software engineering and hardware optimization, it recreates gaming experiences from systems that used entirely different architectures.
The modular nature means the system improves incrementally. Better emulator cores appear regularly, adding accuracy or performance. Firmware updates enhance the Pi's capabilities. You can upgrade individual components-a faster microSD card, a more powerful Pi model, different controllers-without starting over.
For someone wanting to understand rather than just use these kits, the key insight is that emulation involves multiple abstraction layers, each translating between different representations of the same thing. The game thinks it's running on its original hardware, but it's actually running on software that simulates that hardware, which itself runs on completely different physical hardware. The Raspberry Pi's sufficient processing power, combined with open-source emulation software refined over decades, makes this translation fast enough for real-time gaming.
This combination of affordable hardware and mature software explains why "just get a Pi" has become common advice for retro gaming enthusiasts. While not perfect-some systems remain beyond its capabilities-the Pi strikes a remarkable balance between cost, performance, and accessibility for preserving and enjoying classic games.