



Welcome to the exciting world of electronics! If you're a beginner looking to delve into the fascinating realm of electronic circuits, sensors, and microcontrollers, you've come to the right place. The Arduino UNO learning kit is a perfect tool to kickstart your journey. This comprehensive guide will help you master electronics using the Arduino UNO learning kit. So, let's get started!
Introduction to Arduino UNO
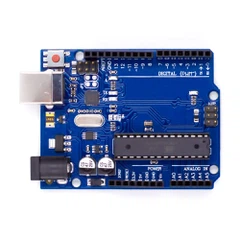
Arduino UNO is a microcontroller board based on the ATmega328P. It has 14 digital input/output pins, 6 analog inputs, a 16 MHz quartz crystal, a USB connection, and a power jack. It's an open-source platform that allows makers, hobbyists, and electronics enthusiasts to create interactive electronic objects.
The Arduino UNO learning kit is a comprehensive package that includes the Arduino UNO board and a host of other components like sensors, LEDs, resistors, and more. It's designed to introduce you to electronics and programming in a hands-on, fun, and engaging way. If you are interested in purchasing an Arduino UNO learning kit, the KuongShun starter kit compatible with Arduino IDE might be your choice.
Benefits of learning Arduino UNO kit
Learning Arduino UNO kit offers numerous benefits, some of which include:
1. Understanding electronics: The Arduino UNO kit is an excellent way to learn about electronics and how they work. It allows you to explore the basics of circuits, sensors, and programming.
2. Hands-on experience: With the Arduino UNO kit, you get hands-on experience in building and programming electronic projects. This practical learning approach helps you to develop problem-solving skills and enhance your creativity.
3. Affordable: The Arduino UNO kit is relatively affordable compared to other microcontroller development boards. This makes it accessible to students, hobbyists, and professionals who want to learn and experiment with electronics.
4. Open-source platform: Arduino UNO kit is an open-source platform, which means that the hardware and software designs are freely available for anyone to use, modify, and distribute. This makes it easy to find resources, tutorials, and projects online.
5. Learn basic coding: Learning how to code can be a great way for kids to explore the world of technology, and the UNO kit is an excellent tool to help them get started. By using the kit, kids can gain a better understanding of how coding can be applied to real-world projects, making it a valuable learning experience that can help them develop essential skills for the future.
Setting Up Your Arduino UNO Learning Kit
Before we dive into projects, let's first set up your Arduino UNO board. Here are the steps:
1. Install the Arduino Software (IDE): Download and install the latest version of the Arduino Software from the official Arduino website. This software is used to write and upload code to the Arduino board.
2. Connect Your Arduino UNO Board: Connect your Arduino UNO board to your computer using a USB cable. The green power LED should light up.
3. Choose Your Board and Port: In the Arduino Software (IDE), select Tools > Board > "Arduino/Genuino UNO". Then select Tools > Port and select the port that your Arduino is connected to.
4. Test Your Setup: Open the Blink example (File > Examples > 01. Basics > Blink). Click the "Upload" button to upload the code to your board. If everything is set up correctly, the onboard LED on your Arduino board should start blinking.
Exploring Basic Projects
Now that you're set-up, let's explore some basic projects using the components in your Arduino UNO learning kit.
Project 1: LED Blink
This is the "Hello World" of electronics. Here's how you can make an LED blink:
1. Connect an LED: Connect the long leg (anode) of your LED to digital pin 13 on your Arduino board and the short leg (cathode) to GND.
2. Write Your Code: In the Arduino IDE, write a simple code that turns the LED on and off.
3. Upload Your Code: Upload your code to your Arduino board. You should see your LED blinking!
Project 2: Temperature Sensor
This project will show you how to use a temperature sensor to measure ambient temperature:
1. Connect Your Temperature Sensor: Connect your temperature sensor (like a TMP36) to your Arduino board. Connect the Vout pin of the sensor to an analog pin on your board.
2. Write Your Code: Write a code that reads the voltage from the sensor and converts it into temperature.
3. Upload Your Code: Upload your code to your Arduino board. You should be able to read the ambient temperature!
Troubleshooting Tips
If you run into issues while working with your Arduino UNO learning kit, here are some troubleshooting tips:
1. Check Your Connections: Ensure all your components are correctly connected to your Arduino board.
2. Check Your Code: Make sure there are no errors in your code. The Arduino IDE will highlight any syntax errors.
3. Check Your Power Supply: Ensure your Arduino board is receiving adequate power.
4. Use the Arduino Community: The Arduino community is a fantastic resource. If you're stuck, chances are someone else has faced the same issue and found a solution.
Frequently Asked Questions - Arduino UNO Kit
Q: Is the Arduino UNO Kit suitable for beginners?
A: Yes, the Arduino UNO Kit is designed with beginners in mind. It provides a great platform to learn about electronics and programming. The kit comes with detailed tutorials and examples to help you get started.
Q: What programming language is used with the Arduino UNO Kit?
A: The Arduino UNO Kit uses the Arduino programming language, which is a simplified version of C++. It is easy to learn and understand, even for beginners.
Q: Can I connect the Arduino UNO Kit to my computer?
A: Yes, you can connect the Arduino UNO board to your computer using a USB cable. This allows you to upload your code to the board and communicate with it.
Q: Are there any resources available to help me get started with the Arduino UNO Kit?
A: Yes, there are plenty of online resources available to help you get started with the Arduino UNO Kit. The official Arduino website provides tutorials, documentation, and a community forum where you can ask questions and share your projects.
Q: Can I expand the Arduino UNO Kit with additional components?
A: Absolutely! The Arduino UNO Kit is highly expandable. You can add more sensors, modules, and components to enhance the functionality of your projects. There are many third-party modules available that are compatible with the Arduino UNO board.
Q: How do I power the Arduino UNO Kit?
A: The Arduino UNO Kit can be powered in two ways: through the USB connection to your computer or by using an external power supply. The board has a built-in voltage regulator that can handle a wide range of input voltages.
Q: Can I use the Arduino UNO Kit for Internet of Things (IoT) projects?
A: Yes, the Arduino UNO Kit can be used for IoT projects. You can connect the board to the internet using shields or modules such as Ethernet or Wi-Fi shields. This allows you to build projects that interact with online services or control devices remotely.
Conclusion
Mastering electronics with the Arduino UNO learning kit is a rewarding journey. It's a playground for creativity, innovation, and learning. Remember, the key to mastering electronics is practice and curiosity. So, don't be afraid to experiment, make mistakes, and learn from them. Happy tinkering!